Showing posts with label Artwork. Show all posts
Thursday, 27 September 2012
July to September...
OK, I know it has been 3 months since I last posted, but like always you get busy and time flies. Throw in some illness and ta-da, here is the end of September! So I thought I'd give a brief overview of what I have been up to.
Firstly we went to New Zealand for a couple of weeks in July. New Zealand is a beautiful place and would love to go back, especially to Queenstown/Wanaka where the snowy mountains and skiing was fantastic.
I have been also very busy on the creative front, designing and making various things which I'll discuss in more detail in a later posts. There have been sightings of double rainbows, birthday celebrations and a trip to Melbourne thrown in for good measure (not to mention we couldn't resist the temptation and saw all the cute animals at Melbourne Zoo).
So basically that's where the last 3 months of my life has disappeared to and the speed that this year is going it will be Christmas before we know it! Eek!
Wednesday, 20 June 2012
Collection of Crafty Card Creations
As you can see, some of these are rather detailed and they did take thought and time to make, but each and every one I enjoyed making and the reaction of the people who received them is even better! I have already shown a few cards I have made on here in previous posts which can be found here, here, here, here and here.
Papercraft puppies
Watercolour daisy
Papercraft garden
This was another fun one, I love using shiny silvery card and glitter, it makes the card pop!
I love making character cards as they provide a challenge in getting all the details close, if not spot on with the real thing, but I only make them for those close to me, for obvious reasons. (Copyright infringements etc.)
This one is one of my favourites, classic Optimus Prime. Not only did I make this for my husband a few years back but I got to use up many card scraps I had around (I prefer not to waste any off cuts) and it came out great! And he got to relive some of his childhood memories upon receiving it :)
Posted by
Heidi
at
6:54 pm
0
comments
Labels:
Animals,
Artwork,
Cards,
Flowers,
Painting,
Papercraft
Monday, 14 May 2012
Made with Love
Now Mother's Day is officially over, I now can share with you some photos of what I made for the mums. I wanted to make a small gift to send to each (as they both live in Tasmania), so I crocheted a couple of bookmarks. They were fiddly as I decided to venture beyond my skills in wool into mercerised cotton. The cotton I used was really fine (ticket weight 40 for anyone out there who wanted to know the type I used), so it was a bit of a challenge to keep it on the hook (size 1.25mm) while trying to chain. I designed these myself and tweaked it as I went along. To go with these I made them each a custom card.
Posted by
Heidi
at
1:01 pm
0
comments
Labels:
Artwork,
Birds,
Cards,
Crochet,
DIY,
Papercraft,
Tasmania
Friday, 11 May 2012
Image Refresh
Well after a lot of wrestling with Illustrator I have finally got my new logo as I imagined it, to replace the temporary title. I have also decided to change the name a little, to 'Twig & Tweak' both to be able to use my pretty ampersand, and because I feel that the new name incorporates more of my design ethos: I like to take a small idea, let it flourish and develop, and tweak the design until I'm perfectly happy with it. My new logo is the perfect example of this, the initial idea was a rough scribble in my notebook, and only after a lot of experimentation and fiddling did I come to the final image which now graces the top of my page.
I also plan to imagine, design and hopefully market some of my creations in the coming year, and wanted a brand that I could carry through from my blog into a potential business. I am excited and very much looking forward to sharing my ideas and designs as I get up and running.
Posted by
Heidi
at
9:24 pm
0
comments
Labels:
Artwork,
Cards,
Crochet,
DIY,
Fabrics,
Papercraft,
Pattern
Friday, 20 April 2012
Fabric Slip Book Cover DIY
Materials and Tools:
- Selected book to be covered
- Base fabric for cover, cut enough to cover the book plus extra for around the edges. (I used calico)
- Feature fabric - could be scrap or offcuts
- Large brown paper bag or card
- Fabric glue
- Wool/thread
- Cotton
- Fabric pen/marker or pencil
- Scissors; fabric, pinking shears and paper/stationary
- Needles; sewing and wool/embroidery
- Ruler
- Iron
- Pegs, peg clamps or bulldog clips
This is the book that I'm making the slip cover for. It is one of my cooking bibles I constantly refer to for any basic recipe.
*I bought this book during my home economics class in grade 8 (15 odd years ago, eek!) for a dollar and it's the best dollar I've spent, I use it that much. The school apparently stopped using them years before I arrived and had them in storage a very long time so they decided to get rid of them. As you can see they obviously hired them out to students and inside was a list where people wrote their name when it was taken out and the last student to hire this particular one was in 1981 - nearly 2 years before I was born!
Lay the paper bag or card out (I used a paper bag) and hold the book on its spine and let the front and back cover lie flat on top. With a pencil trace around the book, mark where the spine is and you should be left with a large rectangle. Using a ruler add about 40-50mm around the rectangle and then draw where the corners are going to be cut and the location of where the spine is and proceed to cut out until you have something similar to what is pictured above. Lay that over the cover fabric and trace around using a fabric pen or marker.
I apologise for the poor photo but you can make out the lines I traced around the template and I added a further 15-20mm around that again, you'll see why in a moment.
As pictured above cut around the outer lines and cut 45 degree angles across the corners as it will make for neat and easy folds when it comes time to iron and glue down.
Using the iron, press and fold over the flaps and then apply some fabric glue and press and hold until it adheres. Leave the fabric to dry thoroughly before moving onto the next step. This will give you a neat edge and will stop the fabric from fraying. However instead of gluing, you could also stitch it up on a sewing machine.
Once dry fold over the larger flaps and using peg clamps, clamp over the corners holding the flaps together as shown.
While clamped, stitch the corners together. I used a straight stitch and continued all the way along for a decorative look.
Using pinking shears, trim the edges of the feature fabric you want to use. For mine I chose Thea and Sami's Spoon & Whisk - fitting for a cookbook - which I picked up at the Bowerbird Bazaar a few months ago.
Using wool (either matching or in contrast colour), stitch around the edge, I used the blanket stitch to give it a pretty border.
Lay the cover out flat and then position the feature fabric piece where you want and then fold the ends over and stitch or glue to the inside of the cover flap.
Now slip the cover over the front and back covers of the book and viola! The book has a new lease on life!
Monday, 19 March 2012
Happy Anniversary!
My husband James and I celebrated our first wedding anniversary last week. When I think about it, I honestly don't know where the time has gone, I'll admit the wedding itself was a bit of a blur after all the build up to the day, yet here we are today a year later.
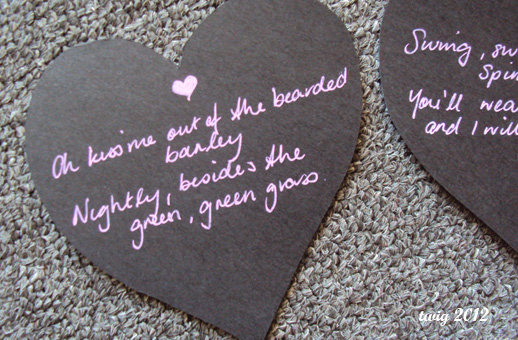
Traditionally the first wedding anniversary is gifted with paper and seeing as I love making anything with paper and card, I set out to make a few paper themed items to give to my dearest! I initially planned to make a "Happy Anniversary" garland but seeing as I didn't really have anywhere to hang it properly, I decided to lay it out on the floor instead. I have oodles of paper and card scraps as I'm one to never throw anything out - yes I'm a little bit of a hoarder - and I always find ways to use them. Fittingly I had some left over invitations from our wedding stationary (printed on gorgeous white luminous card) as well as some black card left over from our friends wedding stationary I made last year. It was perfect to use for the hearts and lettering.
Our logo for our wedding was a seahorse, so I cut out one from the invitations and layered with a '1'. On the reverse of each heart I wrote a couple of lines from the song that we played for our first dance (Kiss Me - Sixpence None the Richer) which surprisingly all fit on, so I keep telling myself it was meant to be!
I also made a 'love box'. I upcycled a black gift box I had in my stash of things which I recovered the lid, added stripes to each side of the box (with more scraps) and I finished the box by attaching a wired ribbon on the lid. Inside were more paper themed items I made; a love letter, quotes, the heart garland and some homemade bath salts. I know technically bath salts do not fit with the paper theme, but we both love a soothing soak in the bath, so I thought it was a nice little addition.
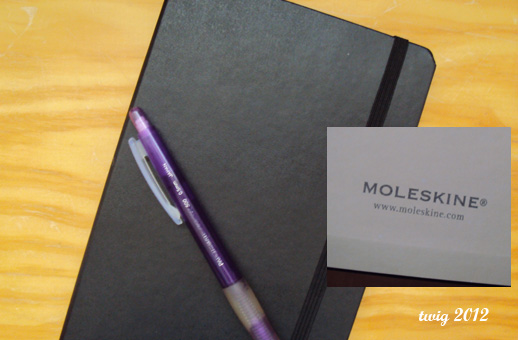
James, in keeping with the paper theme, gave me my first Moleskine! Yes I now can proudly say I have a Moleskine :) I know it's a bit strange in a way seeing that I have many, many sketchbooks in my collection, but I have never owned one until now. I'll have to make sure that when I draw/write in my Moleskine they are treasured scribbles and doing that it is going to be a challenge in itself!
And to round it off is a photo of me in my new dress before going out to dinner at our favourite Japanese restaurant to celebrate. I bought the dress from Target for $10, a bargain considering the original price tag was $50. My purple leather mary-janes matched perfectly as did my glasses. I stylized the dress with a light cyan ribbon as I didn't have a proper belt to match, it still worked and I liked it so that is all that really matters.
Thursday, 1 March 2012
Crochet Fun!
I thought I'd share some of my crochet creations I have made in the past few months, I have certainly had much fun making them.
Seeing as we take our iPods with us when we travel (whether its just to work or on holiday) I thought I'd make a couple of pouches for them and earphones, provides a nice soft buffer between them and everything else that goes in the bag. These were fairly simple to make, I didn't follow any pattern, just made it up as I went, by measuring the iPods, estimating extra space needed for the earphones and voila!
I've always needed a pin cushion and this lil beauty was grown from a couple of crochet boo boos. As I hate to waste anything I decided to make use of them; they were meant be for something else but didn't quite work out. The 'cake' part was originally supposed to be a head of a crochet toy that turned out all distorted, so I just stuffed it with hobby fill and tied off the bottom and then made the 'cup' from some wool that was left over from another item. It worked out perfectly and it takes pride of place on my desk decorated with '100s & 1000s' (map pins) and other needles and safety pins.
This is one of my favourite pieces, an original design. Daffodils are one of my favourite flowers as I love to watch them pop out of the ground in July/August and bloom through to mid spring. They are such a cheerful flower and always put a smile on my face. Unfortunately they don't flower all year round so I decided one afternoon to crochet my own ever-lasting Daffy. Again no pattern here, I just made it up as I went, tweaking here and there until the petals, stem and leaf was the right proportion and shape and I was happy with it. The only thing missing is the sweet subtle daffodil scent!
This is my most recent addition, finally finished this week after being on the go for the past couple of months. As I like to cart around a sketch book and pencils with me, I thought I'd make myself another pouch to put all these things in. The brief I gave myself was that it had to be large enough to fit an A5 sketch/notebook (the sketchbook in the photo is an A6), my beloved 'Flat Cats' pencil tin (which I've owned for more than 13 years ...), sketching pencils - as shown and colouring pencils (tins of Derwent pencils I have collected over the years). Although all of those thing are not going to be carried all the time, I just wanted to make sure they fit when I needed to. I randomised the sections/stripes of blue and red as well as the stitches (combination of double and treble crochet) to add visual contrast and add some texture to the piece, finished with scalloped edging along the top and red ribbon for the draw string.
Monday, 31 October 2011
Bowerbird Bazaar
On Saturday afternoon, my husband and I drove into Adelaide city centre to check out the 'Bowerbird Bazaar', Adelaide's design market. Held at the 'Queen's Theatre', a restored sandstone heritage building in the heart of Adelaide city. The place was packed with so many stalls selling everything from clothing and fabrics to jewellery and fresh flowers, the classic old building really served as a great backdrop to the handmade nature of nearly all the creations on show.
It was very busy; the queue to get into the Theatre flowed out onto the narrow street, extending nearly all the way back to the main road. We waited in the queue, shuffling along for about 20 minutes before we we're lucky enough to get inside. Unfortunately it was so packed with people it was hard to walk around and have a good look at some of the stalls at times, let alone have the space to take photos, still it certainly showed just how many people were interested and excited to get a chance to browse through all the stalls.
There were so many beautiful things on display, it made choosing what to buy and take home so much harder. However I did make a couple of purchases, one being at Thea & Sami's stall. She hadso many beautiful printed fabrics I didn't know where to start! I bought this 'Cottage Garden' print tea towel and I ended going through her entire basket of scrap packs, deciding on a pack that included these gems ('Pets & Bones', 'Mushrooms', Spoon &Whisk' and 'Bird'). My mind is already full of ideas of what to make with these, so stay tuned for the results in a later post.
The other purchase I made - well it's technically going to be my Christmas present :) - was from the wonderful crew at Mattt. They make the most awesome, practical bags and I have been eyeing them off for quite some time, dreaming of when one will actually be mine. Seeing them for real, and checking out the great craftsmanship and styling only increased my desire to be the proud owner of one. I could have taken one of the many that they had for sale however I decided to order one to be made, allowing me to select the fabric panel, and the colour of the straps and zips. Now I will have to wait a couple of weeks before receiving my order, but I think its well worth it to have exactly the colors and design I liked, with a panel from Ink & Spindle.
After an enjoyable couple of hours going round and round checking out the different stalls, we finished off with a freshly squeezed fruit juice from the stall Juice Junkies and left for home. My head awirl with lots of great craft ideas and thoughts based on some of the fantastic creative items I had seen, it really is a great experience to be able to see so much of so many different people work all in the one setting.
It was very busy; the queue to get into the Theatre flowed out onto the narrow street, extending nearly all the way back to the main road. We waited in the queue, shuffling along for about 20 minutes before we we're lucky enough to get inside. Unfortunately it was so packed with people it was hard to walk around and have a good look at some of the stalls at times, let alone have the space to take photos, still it certainly showed just how many people were interested and excited to get a chance to browse through all the stalls.
There were so many beautiful things on display, it made choosing what to buy and take home so much harder. However I did make a couple of purchases, one being at Thea & Sami's stall. She hadso many beautiful printed fabrics I didn't know where to start! I bought this 'Cottage Garden' print tea towel and I ended going through her entire basket of scrap packs, deciding on a pack that included these gems ('Pets & Bones', 'Mushrooms', Spoon &Whisk' and 'Bird'). My mind is already full of ideas of what to make with these, so stay tuned for the results in a later post.
The other purchase I made - well it's technically going to be my Christmas present :) - was from the wonderful crew at Mattt. They make the most awesome, practical bags and I have been eyeing them off for quite some time, dreaming of when one will actually be mine. Seeing them for real, and checking out the great craftsmanship and styling only increased my desire to be the proud owner of one. I could have taken one of the many that they had for sale however I decided to order one to be made, allowing me to select the fabric panel, and the colour of the straps and zips. Now I will have to wait a couple of weeks before receiving my order, but I think its well worth it to have exactly the colors and design I liked, with a panel from Ink & Spindle.
After an enjoyable couple of hours going round and round checking out the different stalls, we finished off with a freshly squeezed fruit juice from the stall Juice Junkies and left for home. My head awirl with lots of great craft ideas and thoughts based on some of the fantastic creative items I had seen, it really is a great experience to be able to see so much of so many different people work all in the one setting.
Wednesday, 21 September 2011
Birds of Spring
Like so many things, nature is very inspiring to me and it never fails from season to season; but spring is my favourite time of year. Fresh new growth sprouts from winter rains, flowers are blooming and new life begins. All the little birds tweeting busily in the trees fussing about their nests with precious babies being protected within. I love it! It inspires me so much that I have many projects on the go, one of them is painting little birds like these!
Subscribe to:
Posts (Atom)