Showing posts with label DIY. Show all posts

Thursday, 27 September 2012

July to September...


OK, I know it has been 3 months since I last posted, but like always you get busy and time flies. Throw in some illness and ta-da, here is the end of September! So I thought I'd give a brief overview of what I have been up to.

Firstly we went to New Zealand for a couple of weeks in July. New Zealand is a beautiful place and would love to go back, especially to Queenstown/Wanaka where the snowy mountains and skiing was fantastic.

I have been also very busy on the creative front, designing and making various things which I'll discuss in more detail in a later posts. There have been sightings of double rainbows, birthday celebrations and a trip to Melbourne thrown in for good measure (not to mention we couldn't resist the temptation and saw all the cute animals at Melbourne Zoo).

So basically that's where the last 3 months of my life has disappeared to and the speed that this year is going it will be Christmas before we know it! Eek!

Monday, 25 June 2012

Potato & Bacon Frittata


While we're already nearly half way through winter, comfort food makes its appearance to cheer one's cold body up. For the last week I have been rather busy in the kitchen cooking some of these winter warmers and decided to share with you one of my favourites of the moment. It is basically a good recipe for left overs but can be made from scratch. The potato and bacon frittata is a good one I have cooked a number of times now and I tend to tweak the recipe with what I have at hand in the fridge and pantry. When I made this one, it was a perfect opportunity to try out the new camera too. I cannot remember where I got the original base recipe for this from, but seeing as I change it slightly each time, I'll call this my recipe.

Ingredients:
- 3 medium potatoes peeled and roughly chopped (you can use left-over roast potatoes)
- 1 medium onion, finely chopped
- 1 tbsp of olive oil
- 1 clove of garlic, crushed
- 2 bacon rashers, cooked and finely chopped
- 1/2 large capsicum, de-seeded and chopped
- 1 large bok choy, stalks chopped and leaves torn (alternatively you can use baby spinach, but I didn't have any on hand)
- 4 eggs, lightly whisked
- 1/2 tsp of smoked paprika
- salt and pepper to taste
- 3/4 cup finely grated colby cheese (or a cheese that has a good melt)
- a few sprigs of finely chopped parsley (I didn't have any growing at the moment so I used a teaspoon of dried parsley)

1. Pre-heat a fan forced oven to 200°C.
2. If not using left over roast potatoes, partly cook potatoes in water for 5-8 minutes in the microwave (or about 10 minutes in a pot on the stove), drained and put aside.
3. Heat a frying pan with oil, once hot add the onions and garlic and fry until lightly golden brown.
4. Add the potatoes and toss and stir until the outside edges are beginning to brown.
5. Grease a rectangular flan pan (approximately 15cm x 30cm) and tip the potato and onions in and evenly distribute around the pan.
6. Sprinkle over the finely chopped bacon, chopped capsicum and bok choy.
7. Whisk the eggs lightly with paprika, salt and pepper, pour over the potatoes and the other things in the flan.
8. Sprinkle over the grated cheese and parsley and place in the oven for 20 minutes or until egg is cooked through and potatoes are tender with the cheese browning on top.
9. Remove from the oven, slice and serve while hot.


This can serve four people as a side dish or two people for a main. It was delicious and the perfect food for the rainy weather we have been having recently.

Wednesday, 13 June 2012

Mini Gromit


These are a few photos of a present I made for my mum's birthday. I finished it over a week ago but couldn't  publish any photos until after her birthday otherwise the surprise would have been ruined. I have been a huge Wallace and Gromit fan for years and I bought a big Gromit softie about 7-8 years ago. Mum has always eyed him off and when we moved to Adelaide she offered to "babysit" but my reply was sorry but he is coming with me :).

I thought the ideal present this year was to make her a Mini Gromit! Her reaction? She LOVED it! Mum said she had an inkling of what her present was when it arrived in the post and she couldn't resist the temptation and opened it up the night before her birthday, but I had no doubt that it was something she was going to love.

I didn't have a pattern to go off to make Mini Gromit, so he was basically a game of trial and error, I crocheted parts and tried my best to keep things in fair proportion. As you might notice in the second photo, Mini Gromit's face is a tad oddly sized, ideally his face should have been larger at the jaw and smaller at the brow but until you start stuffing it with fill, it is hard to really gauge what the finished product will look like. Some bits I had to start over as they looked totally out of whack, but I got there in the end. Having big Gromit sitting close by to look at helped a lot as I didn't need to keep referring to pictures on my DVD cases and books.


To go with Mini Gromit, I wanted to make an appropriate birthday card. So I decided to go with another favourite; Shaun the Sheep! This was a spin off from Wallace and Gromit and I love the animation in both! I created the card with Shaun and his little friend Timmy on the front. I really want to crochet a Timmy, Shaun or perhaps even both for myself sometime in the future, they are too cute.


The last photo is what I call my "family album" shot, every time I make a new softie I have to take I photo of it with my other ones before giving/sending the finished toy to its new home. Ducky (the first duckling I made, starred in my second ever blog post seen here), Lil' Robot and Froggy were my first Amigurumi toys I made last year and they live on my husband's desk and come out for family photo shoots like this one! :)

P.S. Sorry for the poor colouring in the photos, our little compact camera is having "colour issues" and we are hoping to buy a new DSLR very soon, so stay tuned! Can't wait to start playing with it and taking proper photos!

Thursday, 7 June 2012

DIY Yarn Dispenser


I thought I'd show you my quick 3 step DIY for stopping yarn from escaping when crocheting and knitting. The ball always rolls away from me, unravels and then picks up fluff and hair off the carpet which is a bit annoying let alone light coloured yarn getting grub marks on it, also handy in stopping pets taking off and playing with it. It is very simple, all you need is an empty tissue box (or a box large enough for your yarn to fit in if the ball is larger than a tissue box) and paper clip or dog clip.


Step 1: Take one used tissue box and carefully open one end. If you want to glam up your box, decorate it in what ever you like, pretty wrapping paper, fabric, paint etc. I was lucky and had an appropriately patterned box! :)


Step 2: Put ball of yarn in and thread through the opening on top and fold the end back down and clip with paper clip or dog clip.


Step 3: Pull yarn through and start/continue crochet or knitting!

TIP: Due to yarn ball being a little on the large side initially, sometimes it won't spin around in the box properly and the yarn gets a little snagged. I solved this by taking out the ball and unravelling a bit and then loosely winding around the ball, put it back in a its good to go again.

Monday, 28 May 2012

Miss Husqvarna


Meet the one of the newest, but conversely oldest, members of my crafting equipment family; my beloved late Ma-ma Sue's sewing machine. Miss Husqvarna has been sitting at my parent's house in Tasmania all boxed up for the past few years waiting for me to bring her home. Even though I have made multiple trips back "home" since moving to Adelaide 5 1/2 years ago, it wasn't until we took the car over last Christmas that I was able to bring her back with me (bit difficult to carry something like this on a plane so it had to patiently wait).

I haven't got a permanent spot to leave her out and set up and the last few days I have been pottering with making my light box and needed to stitch some fabric for it, so out she came! She did the job well and while she maybe very basic compared to the many computerised ones available these days, she is perfect for a novice like me!

I'll fill you in on a little bit of Miss H's history. My grandparents were known to keep most of their possessions in their old house in immaculate condition and she was no exception. Ma-ma kept her set up in her sewing room on the sewing machine cabinet ready for what seemed like daily use. When Mum and I got it out to check everything was still working in January we discovered that Ma-ma had not only kept ALL the original packaging, but she had kept the purchase receipts to even the A4 glossy brochures she must have picked up prior to purchasing the dear old thing back in 1982! Yes Miss H is 30 years old and doesn't look like she has aged one bit!


Anyhow she is in mint condition considering her age and consistent use over the years. Ma-ma used to sew a lot of her own clothes (and some of mine when I was little) and not to mention the numerous pillow cases, cushion covers, napkins, tissue box covers, soft toys and even Christmas decorations.

I sincerely regret not taking more of an interest in sewing when Ma-ma was still with us, I'm sure she would have loved it. I partially blame my teenage years when at the time "sewing was sooo not cool" and obviously life's other distractions, but I won't dwell on it now. So in her memory I'm going to make an honest attempt to continue her crafty legacy.


Enough of the emotional 'wish I could turn back time stuff' and tell you more about Miss Husqvarna! While she doesn't any of the mod cons of today's machines, she still has a number of features to talk about. She is the 5310 model, and as you can see in the photos she is cream and brown in colour. Her frame/outer body is all metal - no flimsy plastic here - so she is rather solid, but surprisingly not as heavy as one might expect.  Bobbin winding, double spool pins for two threads/double needle.  For the time I'm sure a lot of the little features were new and even revolutionary, but commonplace on machines today, what really stands out is the sense of durability, quality and solidness all wrapped up in a neat little package; every part is nicely crafted and well thought out and I think she sews just as smoothly and efficiently as the day she was bought.

She was cleverly designed to come with an extension table that slots around the arm as well as an accessories tray (with 10 bobbins along with various bits and pieces). All this along with the foot control pedal, everything slots/folds up within the machine so when the case slides over and on, everything is kept together as one package! Neat huh?


Well for now she is back into the box again, after performing brilliantly for my little sewing projects. I'm still just starting out but I plan on getting another 30 years worth of life out of this beautiful and well crafted little machine; I know she will continue to make more great work in the years to come as I learn to use her the way she is meant to be.

Monday, 21 May 2012

Winter Warmers


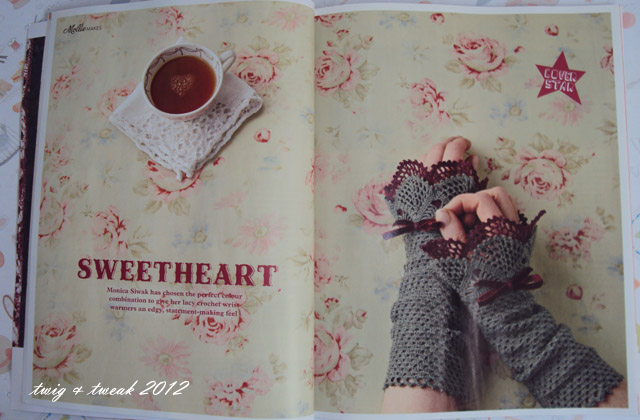
One of my most challenging crochet projects to date I finally finished on Friday. I must say I am proud of my achievement as I only picked up a crochet hook and taught myself how to crochet a year ago. I was delighted when I found the February issue of Mollie Makes at the newsagents a couple of months back (it is UK magazine so the newsagents here a little behind getting them - if at all). I had stumbled across this delightful read after finding out about it from Katia on her Plushka's Craft blog.


Upon seeing the cover I was in love with the wrist warmers that graced it, and was even more excited to discover that the issue had included the pattern for them. After reading it I couldn't resist and decided I would definitely have to give it a go at making these.


I already have a couple of pairs of knitted fingerless/wrist warmers, I practically live in them during the winter months as my fingers and wrists ache from being cold, and I couldn't resist adding another to the collection. These are slightly different to most of my crochet projects, made using a fine mercerised cotton with a soft satin sheen. Its made entirely using the same tiny hook as the bookmarks, no small challenge!


While crocheting the bookmarks were a challenge as well, these wrist warmers are the first that I've actually followed a pattern. Yes, OK I have followed patterns before (notably the Amigurumi toys I've blogged about here and here) - but I have always tweaked them to a degree and they were fairly straight-forward in comparison. The sleeves of the wrist warmers were fairly easy to do, it was the lace detail up the top at the cuff that tested my skills and patience. I had to give myself several breaks for my hands and fingers as I gripped/squeezed too hard at times trying to keep the cotton at the right tension as I chained, but I got there in the end and couldn't wipe the smile off my face. I'm looking forward to wearing them out and about this winter! :)

Monday, 14 May 2012

Made with Love

Now Mother's Day is officially over, I now can share with you some photos of what I made for the mums. I wanted to make a small gift to send to each (as they both live in Tasmania), so I crocheted a couple of bookmarks. They were fiddly as I decided to venture beyond my skills in wool into mercerised cotton. The cotton I used was really fine (ticket weight 40 for anyone out there who wanted to know the type I used), so it was a bit of a challenge to keep it on the hook (size 1.25mm) while trying to chain. I designed these myself and tweaked it as I went along. To go with these I made them each a custom card.


This last photo I had to share, these two cute little swallows have been visiting each day lately, early morning, then disappearing during the day to go about their business and then returning at dusk to perch for half hour or so before flying off to where ever their nest is for the night. They love sitting on the clothes line with their little heads constantly turning, watching the other birds fly about. Also the clothes line is out of reach from the cats so I think they think its a bit of a safe haven to have a break from zooming about the place. Too cute! :)

Friday, 11 May 2012

Image Refresh

Well after a lot of wrestling with Illustrator I have finally got my new logo as I imagined it, to replace the temporary title.  I have also decided to change the name a little, to 'Twig & Tweak' both to be able to use my pretty ampersand, and because I feel that the new name incorporates more of my design ethos: I like to take a small idea, let it flourish and develop, and tweak the design until I'm perfectly happy with it.  My new logo is the perfect example of this, the initial idea was a rough scribble in my notebook, and only after a lot of experimentation and fiddling did I come to the final image which now graces the top of my page.

I also plan to imagine, design and hopefully market some of my creations in the coming year, and wanted a brand that I could carry through from my blog into a potential business. I am excited and very much looking forward to sharing my ideas and designs as I get up and running.

Thursday, 26 April 2012

Crochet Cushion Covers


Another little project I finished on Saturday. I started about two weeks ago after deliberating on whether to buy new cushions for the couch as the two black ones we bought 5 years ago were looking somewhat sorry and flat. I was also looking for another crochet project to potter with as well. While daydreaming and staring at the couch I looked at my little Ikea coloured patterned cushion and then something when 'ting' in my brain... why don't I crochet some and utilise the existing black covers! This way I didn't need buy more fabric to sew up new covers for the crochet to be stitched to, therefore no wastage! All I needed to buy then was the new cushion inserts.


For the first cushion I crocheted many many little coloured circles and then spent time arranging them into a patterns I liked - which in the end I couldn't decide and asked James to choose one. Turned out to be a good choice as it was one of the ones I had short listed in my mind. Then I proceeded to stitch all the little circles together and, using black wool, crochet a thick border around it to frame. Finally hand stitched the crocheted piece to the cover and put the cushion insert in and ta da! Pretty cushion!

I decided for the second one I'd try a different pattern using the same colours I used in the first and now I have two lovelies sitting on the couch brightening the room up! Every time I look at the couch now it makes me smile! I love bright colours and different patterns and these cushions are unique as they were made by me! So satisfying!

I'm on a crocheting roll, I have started crocheting wrist warmers so once they're complete I will put a post up of those too. Stay tuned.

Friday, 20 April 2012

Fabric Slip Book Cover DIY


Materials and Tools:
- Selected book to be covered
- Base fabric for cover, cut enough to cover the book plus extra for around the edges. (I used calico)
- Feature fabric - could be scrap or offcuts
- Large brown paper bag or card
- Fabric glue
- Wool/thread
- Cotton

- Fabric pen/marker or pencil
- Scissors; fabric, pinking shears and paper/stationary 

- Needles; sewing and wool/embroidery 
- Ruler
- Iron
- Pegs, peg clamps or bulldog clips


This is the book that I'm making the slip cover for. It is one of my cooking bibles I constantly refer to for any basic recipe. 
*I bought this book during my home economics class in grade 8 (15 odd years ago, eek!) for a dollar and it's the best dollar I've spent, I use it that much. The school apparently stopped using them years before I arrived and had them in storage a very long time so they decided to get rid of them. As you can see they obviously hired them out to students and inside was a list where people wrote their name when it was taken out and the last student to hire this particular one was in 1981 - nearly 2 years before I was born!


Lay the paper bag or card out (I used a paper bag) and hold the book on its spine and let the front and back cover lie flat on top. With a pencil trace around the book, mark where the spine is and you should be left with a large rectangle. Using a ruler add about 40-50mm around the rectangle and then draw where the corners are going to be cut and the location of where the spine is and proceed to cut out until you have something similar to what is pictured above. Lay that over the cover fabric and trace around using a fabric pen or marker.


I apologise for the poor photo but you can make out the lines I traced around the template and I added a further 15-20mm around that again, you'll see why in a moment.


As pictured above cut around the outer lines and cut 45 degree angles across the corners as it will make for neat and easy folds when it comes time to iron and glue down.


Using the iron, press and fold over the flaps and then apply some fabric glue and press and hold until it adheres. Leave the fabric to dry thoroughly before moving onto the next step. This will give you a neat edge and will stop the fabric from fraying. However instead of gluing, you could also stitch it up on a sewing machine.


Once dry fold over the larger flaps and using peg clamps, clamp over the corners holding the flaps together as shown. 


While clamped, stitch the corners together. I used a straight stitch and continued all the way along for a decorative look.


Using pinking shears, trim the edges of the feature fabric you want to use. For mine I chose Thea and Sami's Spoon & Whisk - fitting for a cookbook - which I picked up at the Bowerbird Bazaar a few months ago.


Using wool (either matching or in contrast colour), stitch around the edge, I used the blanket stitch to give it a pretty border.


Lay the cover out flat and then position the feature fabric piece where you want and then fold the ends over and stitch or glue to the inside of the cover flap.


Now slip the cover over the front and back covers of the book and viola! The book has a new lease on life!